
Introduction: The Irresistible Allure of Peanut Butter Kiss Cookies
Why Peanut Butter Kiss Cookies Are a Classic Treat
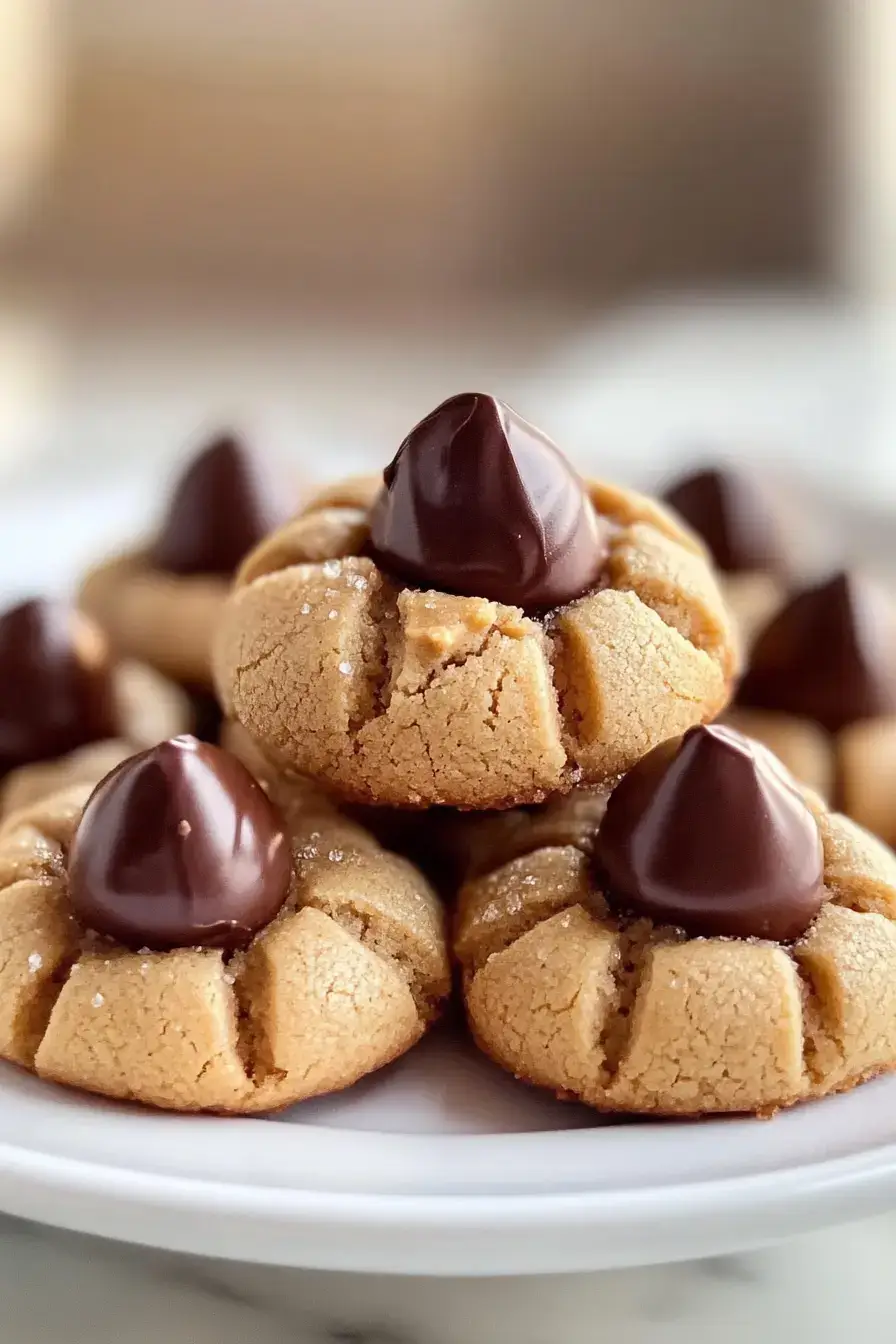
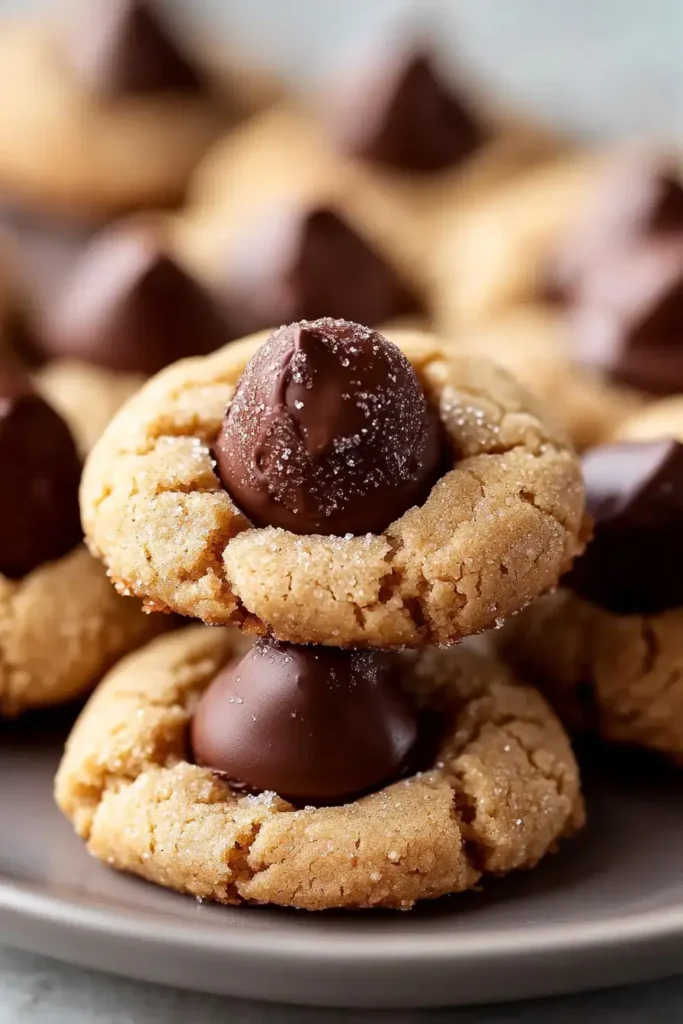
Peanut Butter Kiss Cookies, with their melt-in-your-mouth texture and iconic chocolate center, have been a beloved dessert for decades. These cookies are a staple at holiday gatherings, school bake sales, and cozy family evenings. What sets them apart is their combination of the nutty richness of peanut butter and the sweetness of a perfectly placed chocolate kiss. They’re not only delicious but also nostalgic, evoking memories of warm kitchens and cherished moments.
This recipe is perfect for bakers of all skill levels. Whether you’re a beginner or an experienced baker, these cookies come together effortlessly with pantry staples. Plus, their adorable appearance makes them a showstopper at parties or a thoughtful homemade gift. Want to elevate your baking repertoire? Try pairing these cookies with other holiday favorites like Baked Cranberry Cream Cheese Dip for a festive spread that delights guests.
What Makes This Recipe Stand Out
Peanut Butter Kiss Cookies aren’t just about flavor—they’re about tradition. Their versatility allows you to customize them with dark chocolate, white chocolate, or even caramel-filled kisses. Furthermore, their bite-sized nature makes them a hit with both kids and adults alike. The ease of preparation also makes them a fantastic project for families to enjoy together, creating memories while savoring the sweet rewards.
This recipe guide will walk you through the essential tools, ingredients, and step-by-step instructions to create these irresistible cookies. Along the way, we’ll also share tips for variations, storage, and serving to make sure your baking experience is flawless.
What You’ll Need: Essential Tools for Baking Perfect Peanut Butter Kiss Cookies
Basic Baking Tools for Success
To ensure your Peanut Butter Kiss Cookies turn out perfectly, having the right tools is key. Start with a sturdy mixing bowl for combining ingredients and a reliable hand or stand mixer to achieve the perfect creamy consistency for the peanut butter and sugar mixture. A silicone spatula is invaluable for scraping every bit of dough, minimizing waste and making cleanup easier. Additionally, ensure you have a baking sheet and parchment paper to prevent sticking and make transferring cookies seamless.
If you enjoy efficiency in your kitchen, a cookie scoop will come in handy to create evenly sized dough balls, ensuring your cookies bake uniformly. This is especially useful when making a large batch, as it reduces prep time significantly. Remember, evenly baked cookies not only taste better but also look more appealing, a factor that matters for holiday platters or bake sales.
For easy preparation and cleanup, tools like silicone baking mats can replace parchment paper. These mats are eco-friendly, reusable, and help distribute heat evenly for consistent baking results.
Special Equipment for Enhanced Results
While the basics are sufficient, a few specialized tools can elevate your baking game. A digital kitchen scale allows you to measure ingredients with precision, which is particularly important for consistent results in baking. Peanut Butter Kiss Cookies rely on accurate ratios to achieve their signature soft texture, so this tool can make a noticeable difference.
An oven thermometer is another excellent investment. Even slight temperature variations can impact baking times and outcomes. Ensuring your oven is calibrated correctly helps you avoid underbaked or overly crispy cookies. Lastly, cooling racks are essential for allowing the cookies to cool evenly and prevent them from becoming soggy on the bottom.
Preparation Tips for Smooth Baking
Before diving into the recipe, make sure your ingredients are at room temperature, especially the peanut butter and butter. Room-temperature ingredients mix more easily, resulting in a smoother dough. Prepping your workspace with all tools and ingredients ready can save time and reduce stress.
For an added festive touch, pair these cookies with a warm dip like Baked Cranberry Cream Cheese Dip. It creates a delightful spread that combines sweet and savory elements, perfect for holiday gatherings.

Ingredients: The Building Blocks of Peanut Butter Kiss Cookies
Essential Ingredients for Perfect Cookies
The foundation of Peanut Butter Kiss Cookies lies in simple, pantry-friendly ingredients that combine to create their iconic flavor and texture. Here’s what you’ll need:
- Creamy Peanut Butter: The star ingredient that gives the cookies their rich, nutty base. Avoid natural peanut butter with oil separation, as it can affect the consistency of the dough.
- Granulated Sugar: Adds sweetness and helps create a delicate crispness on the exterior.
- Brown Sugar: Contributes to a soft, chewy interior with a hint of caramel flavor.
- Unsalted Butter: Provides moisture and richness; ensure it’s softened to room temperature for easy mixing.
- All-Purpose Flour: The structural backbone of the cookies; measure carefully for the best results.
- Egg: Acts as a binder and adds moisture, helping the dough come together perfectly.
- Vanilla Extract: Enhances the flavor profile and adds a warm, sweet aroma.
- Baking Soda: Ensures the cookies rise slightly for a tender texture.
- Hershey’s Kisses: The chocolate center that makes these cookies iconic. Opt for milk chocolate or experiment with dark or white chocolate for variety.
Optional Additions for Customization
For a unique twist, consider adding these ingredients:
- Mini Chocolate Chips: Mix into the dough for extra chocolatey bites.
- Coarse Sea Salt: Sprinkle lightly on top for a sweet-salty combination.
- Cinnamon or Nutmeg: A pinch of spice can add warmth and complexity to the flavor.
Including complementary dishes like Stuffed Potato Cakes can make your dessert table a mix of savory and sweet delights.
Ingredient Tips for Success
- Always sift your flour to prevent clumps and ensure even mixing.
- For an extra soft cookie, substitute half the butter with cream cheese.
- Ensure your Hershey’s Kisses are unwrapped before baking to avoid delays during assembly.
For more festive inspiration, try pairing these cookies with Baked Cranberry Cream Cheese Dip, which adds a bright and tangy contrast to the sweetness of the cookies.
Instructions: Step-by-Step Guide to Baking Peanut Butter Kiss Cookies
Mixing the Dough
- Cream the Sugars and Butter
- In a large mixing bowl, combine softened unsalted butter, granulated sugar, and brown sugar. Use a hand or stand mixer to cream the ingredients until light and fluffy, about 2–3 minutes. This step is essential for achieving the perfect cookie texture.
- Add creamy peanut butter and continue mixing until fully incorporated. This ensures the nutty flavor is evenly distributed throughout the dough.
- Incorporate the egg and vanilla extract, mixing on low speed until just combined. Overmixing at this stage can lead to dense cookies.
- Combine Dry Ingredients
- In a separate bowl, whisk together all-purpose flour and baking soda. Gradually add the dry ingredients to the wet mixture, mixing until a cohesive dough forms. The dough should be slightly sticky, but not wet.
- For enhanced texture, consider folding in mini chocolate chips or a pinch of coarse sea salt at this stage.
Shaping and Baking the Cookies
- Shape the Dough
- Preheat your oven to 375°F (190°C).Line a baking sheet with parchment paper or a silicone baking mat.
- Using a cookie scoop or your hands, roll the dough into 1-inch balls. For uniform cookies, ensure the balls are of equal size.
- Bake to Perfection
- Place the cookie dough balls on the prepared baking sheet, spacing them about 2 inches apart. Bake in the preheated oven for 8–10 minutes, or until the edges are set but the centers remain soft.
- Remove the baking sheet from the oven and immediately press an unwrapped Hershey’s Kiss into the center of each cookie. The residual heat will slightly melt the chocolate, creating a perfect bond.
Cooling and Final Touches
- Cool the Cookies
- Allow the cookies to cool on the baking sheet for 5 minutes before transferring them to a wire rack to cool completely. Cooling on the rack prevents sogginess and helps maintain the cookies’ shape.
- Serve and Enjoy
- Pair these delightful cookies with a festive appetizer like Baked Cranberry Cream Cheese Dip for a complete holiday spread.
Nutrition Score: A Closer Look at Peanut Butter Kiss Cookies
Calorie Breakdown and Key Nutrients
Peanut Butter Kiss Cookies strike the perfect balance between indulgence and portion control. Each cookie typically contains around 100–120 calories, depending on the size and ingredients used. Here’s a breakdown of the main nutritional components per cookie:
- Calories: 110
- Fat: 6g (mostly from peanut butter and butter)
- Carbohydrates: 12g (from sugars and flour)
- Protein: 2g (thanks to the peanut butter)
- Fiber: 0.5g
- Sugar: 8g
These cookies provide a quick energy boost, making them a great treat for active days or festive occasions. However, their sugar content means they should be enjoyed in moderation.
Healthy Swaps for Lighter Cookies
For those seeking a lighter version, here are some ideas:
- Reduce Sugar: Substitute half of the granulated sugar with a sugar alternative like Stevia or monk fruit sweetener.
- Use Whole Wheat Flour: Replace all-purpose flour with whole wheat flour for an added boost of fiber.
- Cut Back on Butter: Swap half the butter with unsweetened applesauce for fewer calories and a moister cookie.
Balancing Sweet Treats in a Healthy Diet
While these cookies are undeniably delicious, they are best enjoyed as an occasional treat. Consider incorporating them into a holiday dessert table alongside other options, like Baked Cranberry Cream Cheese Dip, to share the sweetness and limit overindulgence.
Serving & Storage: Maximizing Freshness and Enjoyment
Serving Suggestions for Maximum Delight
Peanut Butter Kiss Cookies are versatile and perfect for any occasion. Here’s how to serve them:
- Holiday Gatherings: Arrange these cookies on a festive platter alongside complementary appetizers like Stuffed Potato Cakes to balance sweet and savory flavors.
- Coffee Pairing: These cookies pair beautifully with a cup of coffee or hot cocoa, making them an ideal afternoon treat.
- Gift Ideas: Stack them neatly in decorative tins or wrap them in clear bags tied with ribbon for a thoughtful, homemade gift.
For added flair, dust the cookies lightly with powdered sugar or drizzle melted chocolate over the top before serving.
Storage Tips for Long-Lasting Freshness
To keep your cookies fresh and delicious:
- Room Temperature: Store cookies in an airtight container at room temperature for up to 5 days. Place parchment paper between layers to prevent sticking.
- Refrigeration: If you need to keep them longer, refrigerate the cookies in an airtight container for up to 2 weeks.
- Freezing: Freeze baked cookies in a freezer-safe container for up to 3 months. Thaw at room temperature before serving to achieve the best texture.
If freezing dough, roll it into balls first and freeze on a baking sheet before transferring them to a freezer bag. This method allows you to bake fresh cookies on demand.
Reheating and Refreshing Cookies
- For slightly warm cookies, place them in a microwave for 5–8 seconds.
- Alternatively, heat them in the oven at 300°F (150°C) for 3–5 minutes to restore their just-baked flavor.
Pair these cookies with a festive spread that includes Baked Cranberry Cream Cheese Dip for a delightful mix of flavors and textures.
Variations: Creative Twists on Peanut Butter Kiss Cookies
Flavorful Additions for a New Spin
If you’re looking to add a unique flair to your Peanut Butter Kiss Cookies, consider these creative flavor variations:
- Chocolate Peanut Butter Kiss Cookies: Swap out some of the flour for cocoa powder to create a rich, chocolatey base.
- Salted Caramel Kiss Cookies: Replace the traditional chocolate kiss with a caramel-filled kiss, then sprinkle sea salt on top for a sweet-and-salty twist.
- Nutty Variations: Add chopped peanuts, almonds, or pecans to the dough for an extra crunch.
Seasonal and Holiday Themes
Elevate your cookies with holiday-themed ingredients:
- Christmas Edition: Add festive sprinkles to the dough or roll the cookie balls in colored sugar before baking.
- Valentine’s Day: Use heart-shaped chocolate pieces or pink and red sprinkles to celebrate love.
- Fall Favorites: Add a touch of cinnamon or nutmeg to the dough for warm, spiced cookies perfect for autumn gatherings.
Dietary-Friendly Options
Accommodate different dietary needs with these alternatives:
- Gluten-Free: Use a 1:1 gluten-free baking flour substitute to maintain the same texture and flavor.
- Vegan Version: Replace butter with vegan butter and the egg with a flaxseed or chia seed substitute.
- Keto-Friendly: Opt for almond flour and a low-carb sweetener to make these cookies fit for a ketogenic diet.
No matter the variation, these cookies are sure to impress. Experiment with flavors to find your favorite twist!
FAQs: Answering Common Questions About Peanut Butter Kiss Cookies
1. What Are the Basic Ingredients for Peanut Butter Cookies?
Peanut butter cookies typically require just a few pantry staples: creamy peanut butter, granulated sugar, brown sugar, all-purpose flour, eggs, butter, and a leavening agent like baking soda. These ingredients work together to create a cookie that is rich, soft, and slightly chewy. Adding vanilla extract enhances the flavor profile, while Hershey’s Kisses provide the classic finishing touch.
2. What Are Snoop Dogg Cookies?
Snoop Dogg cookies refer to recipes from the rapper’s popular cookbook, “From Crook to Cook.” While these cookies often include creative twists and fun ingredients, Peanut Butter Kiss Cookies stand apart as a traditional dessert. However, you can adapt this recipe to include a playful element, like flavored kisses or vibrant sprinkles, inspired by Snoop’s creative approach to cooking.
3. Why Aren’t My Peanut Butter Cookies Chewy?
A few factors might cause your cookies to lose their chewiness:
- Overbaking: Baking for too long can dry out the cookies. Remove them from the oven when the edges are set but the center is still soft.
- Ingredient Ratios: Ensure the butter and sugar proportions are correct, as too much flour can result in a dry texture.
- Room Temperature Ingredients: Using ingredients at room temperature ensures better blending and consistency in the dough.
Follow the tips outlined in the Baked Cranberry Cream Cheese Dip recipe for similar ingredient preparation techniques.
4. Why Do You Put Fork Marks in Peanut Butter Cookies?
Fork marks are a hallmark of traditional peanut butter cookies. These marks serve both aesthetic and practical purposes:
- Texture: They flatten the dough for even baking.
- Tradition: The crisscross pattern is a signature look, making them instantly recognizable.
- Functionality: The dough is denser than typical cookie dough, and flattening ensures it spreads evenly during baking.
Though not needed for Peanut Butter Kiss Cookies, these classic details connect your baking to timeless traditions.
Conclusion: The Perfect Treat for Any Occasion
Peanut Butter Kiss Cookies are more than just a dessert—they’re a heartfelt tradition that brings people together. From their rich peanut butter flavor to the indulgent chocolate kiss at the center, these cookies are a testament to the beauty of simple yet perfect combinations. Whether you’re baking for a holiday gathering, gifting them to loved ones, or enjoying them with a warm cup of coffee, these cookies never fail to delight.
Throughout this guide, we’ve explored everything from essential tools and ingredients to creative variations and storage tips. By following these steps and incorporating personal touches, you can make these cookies your own and create memories that last a lifetime.